Written by Md Masud Rana based on published expert sources. This article has not been professionally reviewed. See our sources below. Last updated: October 2026.
Most kitchen bins tell the same story every week. Vegetable peelings, coffee grounds, a few apple cores, maybe the sad lettuce you forgot about — all of it bagged up and sent to landfill. Learning how to start composting at home changes that story completely, and it is far less fiddly than most guides make it sound.
Composting is just controlled rotting. Microbes and tiny soil animals break your plant-based scraps down into a dark, earthy material you can feed to your garden for free. No special degree needed, no expensive equipment — and no smell if you get the basics right.
In the next few minutes you will learn which composting method suits your home, exactly what can go in and what must stay out, the greens-to-browns balance that stops most problems before they start, and how to know when your first batch is ready. Everything here is grounded in guidance from the US Environmental Protection Agency’s home composting page and the University of Maryland Extension’s composting fact sheet, not guesswork.
The quick answer: To start composting at home, pick a method (backyard pile, bin, tumbler or worm bin), collect fruit and vegetable scraps plus coffee grounds as your “greens”, and mix them with roughly two to three times that volume of dry “browns” such as leaves or shredded cardboard. Keep the pile as damp as a wrung-out sponge, turn it every week or two, and expect dark, crumbly compost in about three to five months.
Contents
- Why Composting at Home Is Worth the Effort
- How to Start Composting at Home: Choosing Your Method
- What You Can Compost (and What Must Stay Out)
- The Greens-and-Browns Balance That Makes It Work
- Building Your First Compost Pile, Step by Step
- Keeping It Alive: Moisture, Air and Turning
- Troubleshooting: Smells, Pests and a Pile That Won’t Heat
- Using Your Finished Compost
- What Recent Research Shows
- Common Composting Mistakes to Avoid
- Final Recommendations
- Frequently Asked Questions
Why Composting at Home Is Worth the Effort
Here is a fact that reframes the whole thing. The US EPA’s From Field to Bin report found that wasted food is the single most common material in American landfills — about 24% of everything buried — and that over a third of US food is never eaten. Buried food breaks down without oxygen and releases methane, a greenhouse gas far more potent than carbon dioxide over the short term.
Composting sidesteps that entirely. Because a compost pile is full of air, the same scraps decompose aerobically — which the University of Maryland Extension notes avoids the methane problem of landfill while returning nutrients to the soil.
The payoff in your own garden
Finished compost is not just a feel-good by-product. According to the EPA, it improves soil structure and water retention, feeds beneficial organisms, and reduces the need for bought fertilisers and pesticides — all while saving you money. If you grow anything — vegetables, roses, a stubborn lawn — a bucket of home-made compost genuinely performs: crumbly, dark, smelling faintly of forest floor.
It is easier than the internet suggests
Most beginners overthink the setup and underthink the maintenance. You don’t need a thermometer or a three-bay pallet system. A simple pile, or even a plastic bin on a balcony, will work if you get two things right — the balance of materials and the moisture. If composting is one part of a wider effort to tread lighter, our Eco Living basics guide covers the other everyday swaps worth making.
How to Start Composting at Home: Choosing Your Method
The best composting method is the one you will actually maintain. A grand system that bores you into abandonment produces nothing but a smelly corner. Be honest about your space, your climate, and how much fiddling you enjoy, then pick one.
The five home options, compared
| Method | Best for | Effort | Speed |
|---|---|---|---|
| Open pile | Gardens with space; high volume of yard waste | Low to moderate | 6–12 months untended; 3–5 months with turning |
| Stationary bin | Tidy gardens; keeps the pile contained | Moderate | Similar to a pile |
| Tumbler | Small gardens; people who like easy turning | Low | As fast as 2–3 months in warm weather |
| Worm bin (vermicomposting) | Flats, balconies, indoor composting | Low, but regular | Harvest in 3–6 months |
| Community drop-off | Renters; anyone with zero outdoor space | Minimal | You supply scraps, they compost them |
Backyard pile or bin
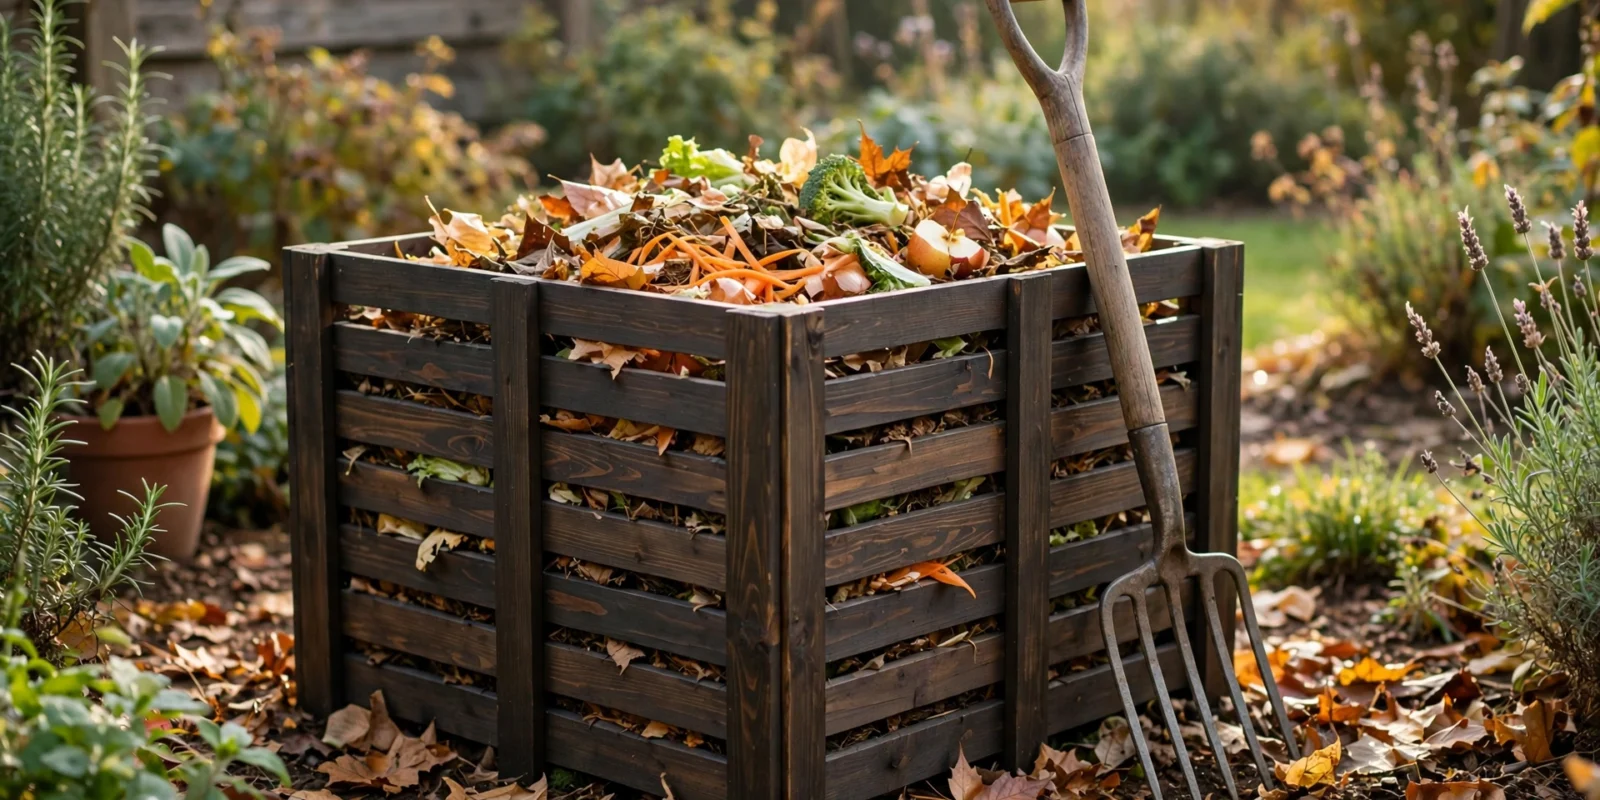
This is the classic and the cheapest. You need about a square metre of ground, ideally in a spot with good drainage that you can reach all year. Bins — bought or built from wood, wire or cinder blocks — keep the pile neat and discourage animals. The EPA advises reinforcing any bin with a lid and a floor, with no gaps larger than about 6mm, if rodents are a concern in your area.
Worm composting for small spaces
No garden? No problem. Worm composting, or vermicomposting, fits under a kitchen sink or on a balcony. The EPA describes a simple setup: a dark plastic bin with air holes, bedding of moist shredded newspaper, and about half a kilo of red wriggler worms (Eisenia fetida — a different species from garden earthworms, so don’t dig them up from outside). Fed sensibly, a well-kept worm bin doesn’t smell. The resulting vermicompost is a particularly rich soil amendment, harvestable after three to six months.
You’ll also see countertop electric gadgets marketed as composters. The EPA is blunt: they grind and dehydrate food scraps but do not produce compost — only a dried mixture that still needs a composting system. Bokashi pickling is a useful pre-treatment, but its output needs composting afterwards too. For a beginner, a pile, bin, tumbler or worm bin is the honest route.
What You Can Compost (and What Must Stay Out)
Beginners lose more piles to the wrong ingredients than to anything else. The rule of thumb: if it grew from a plant and isn’t diseased, it can probably go in. Anything greasy, meaty or chemically treated stays out. Here is the EPA’s breakdown, adapted for backyard composting:
| Greens (nitrogen-rich) | Browns (carbon-rich) |
|---|---|
| Fruit and vegetable scraps | Dry leaves |
| Coffee grounds and paper filters | Shredded newspaper and plain cardboard |
| Tea bags (paper, no staples) | Untreated wood chips and sawdust |
| Crushed eggshells | Straw and hay |
| Fresh grass clippings | Plant stalks and twigs |
| Old houseplants | Hair and fur |
Greens feed the microbes nitrogen; they are wet, fast to rot and the part that smells if left alone. Browns supply carbon, absorb moisture and keep air flowing through the pile. You’ll notice the table is a little lopsided — that reflects real life. Kitchen scraps arrive daily; dry leaves arrive in autumn. We’ll handle that imbalance in the next section.
The never list
Keep these out of a home compost pile, per the EPA and the University of Maryland Extension:
- Meat, fish, bones and dairy. They smell, attract rats and flies, and a home pile rarely gets hot enough to break them down safely. The Extension adds that commercial facilities can handle them; your backyard pile cannot.
- Fats, oils and grease. Same problems — odour and pests — plus they coat materials and slow everything down.
- Dog and cat waste, or soiled cat litter. Pet faeces can carry pathogens that home composting temperatures won’t reliably destroy. Our eco-friendly pet care guide has safer ideas for greening up your pet routine instead.
- Diseased or pest-ridden plants. A cool pile won’t kill the problem; it will spread it back into your garden.
- Treated or painted wood, glossy or coloured paper, and coal ash. Chemicals you don’t want in your soil have no place in your compost.
- Herbicide-treated grass clippings. Some lawn chemicals survive composting and can damage plants later.
One common worry: citrus and onion scraps. In a normal outdoor pile they’re fine in moderation — they only cause trouble in worm bins, where the EPA advises skipping citrus and strong-smelling foods because worms dislike them.
The Greens-and-Browns Balance That Makes It Work
If composting has a secret, this is it — and it’s barely a secret. Microbes need carbon for energy and nitrogen for growth, and the ratio between them decides whether your pile hums along or turns into a soggy mess.
The two ratios that matter
Scientists talk about the carbon-to-nitrogen ratio, and the University of Maryland Extension puts the ideal at roughly 30:1 by weight. The EPA translates it into kitchen language: add two to three times the volume of browns as greens.
Notice the direction of the imbalance: beginners almost always run too green. Food scraps arrive every day; browns don’t. The fix is unglamorous but effective — keep a sack of shredded newspaper, dry leaves or torn-up cardboard next to your compost area, and add a generous handful every time you empty the kitchen caddy.
Reading your pile like a dashboard
You don’t need instruments; the pile tells you what’s wrong:
- Smells like rotten eggs or ammonia? Too wet, too green, or packed too tight. The Extension recommends adding dry browns and turning the pile to reintroduce air — anaerobic pockets are the smell’s cause.
- Sitting there doing nothing? Probably too dry or too carbon-heavy. Moisten it and add nitrogen-rich greens such as fresh grass clippings or vegetable scraps.
- Steaming gently and shrinking? That’s the sweet spot. Leave it alone and check back in a week.
One habit that prevents most trouble
The EPA suggests burying every addition of food scraps under 10–20 cm (4–8 inches) of dry browns. This one habit does three jobs at once: it absorbs the moisture that causes smells, it hides food from flies and rodents, and it keeps the surface from going slimy. Make it automatic and half your troubleshooting disappears before it starts.
Building Your First Compost Pile, Step by Step
Enough theory. Here’s the actual build, adapted from the EPA’s backyard composting steps. Set aside an hour on a dry afternoon.
Step 1 — Choose your spot and gather materials
Pick a level spot with good drainage, reachable all year, with a water source nearby — a hose is ideal. Don’t push the pile hard against a fence; you need access from at least one side, and airflow matters. Before you start, stock up: a kitchen caddy with a lid for scraps, and a separate dry store of browns (bagged leaves, shredded cardboard or straw) within arm’s reach. Store scraps in the caddy on the counter or in the fridge; emptied every couple of days, it won’t smell.
Step 2 — Lay the base
Start with a 10–15 cm (4–6 inch) layer of bulky browns — twigs, small branches, wood chips. This absorbs extra liquid and lets air circulate underneath. Chop or shred anything chunky first; corn cobs, broccoli stalks and cardboard all break down far faster in smaller pieces.
Step 3 — Layer like lasagne
Now alternate: a layer of greens, a thicker layer of browns, and so on, roughly two to three times the browns by volume. Dampen each brown layer lightly as you add it. Don’t stress about precision — but finish by watering lightly if the materials feel dusty.
Step 4 — Set your weekly rhythm
For the first month, check the pile once or twice a week: empty the caddy, bury it under browns, give the pile a quick fork-turn, and squeeze a handful to check moisture. Picture a bin that smells faintly sweet and earthy instead of sour — that’s the weekly rhythm working.
Keeping It Alive: Moisture, Air and Turning
A compost pile is a small ecosystem, and like any ecosystem it mostly wants three things left alone. Your job is a light touch, not constant intervention.
Moisture: the wrung-out sponge test
The single most useful diagnostic costs nothing. Squeeze a handful of pile material: it should feel damp, like a wrung-out sponge, releasing at most a drop or two of water. Crumbly and dusty means too dry — add water and turn. Soggy means too wet — add dry browns and turn. In rainy spells, a tarp over the pile stops it waterlogging. The University of Maryland Extension puts it plainly: moist, not waterlogged.
Air: why turning matters
Composting microbes breathe oxygen. Without it, the pile goes anaerobic, slows down, and starts smelling. Turning — forking the outside material into the centre — reintroduces air and mixes unrotted edges into the hot middle. Every week or two is plenty. A tumbler makes this trivially easy, which is why beginners love them.
Heat: what to expect
A healthy backyard pile warms up in the centre — the EPA notes a well-maintained pile can reach 55–70°C (130–160°F), which also helps suppress pathogens and weed seeds. Don’t panic if yours never gets that hot; cool, slow piles still produce perfectly good compost — they just take the better part of a year. A well-turned pile can finish in three to five months.
Two finishing steps the EPA recommends: let the pile cure for at least four weeks without adding new material, and sift it through a coarse screen to pull out twigs, pits and eggshell bits, which go straight back into the next pile. Expect the finished heap to be about a third of the size it started.
Troubleshooting: Smells, Pests and a Pile That Won’t Heat
Every composter meets these problems. None of them are fatal, and all of them have the same small set of fixes.
Bad smells
The rotten-egg smell is hydrogen sulphide from airless pockets; the ammonia smell is excess nitrogen escaping. Both point the same direction: add dry browns and turn the pile to get air moving. The Maryland Extension’s troubleshooting guide is explicit — soggy or ammonia-smelling piles need browns plus turning, not fancy additives.
Rats, mice and flies
A well-run pile shouldn’t attract rodents. Use a bin with a lid and floor, keep gaps under about 6mm, bury food scraps deep under browns, and never add meat, dairy or greasy foods. Fruit flies usually mean exposed scraps on the surface — bury them and the flies vanish within days.
A pile that won’t heat up
Cold piles are usually one of three things: too small (under about a cubic metre, piles struggle to hold heat), too dry, or too carbon-heavy. Bulk it up with more material, moisten it, mix in fresh greens, and turn it. Give it a week. Patience is a legitimate technique here.
Worm bin troubles
Worms are fussy about temperature: the EPA recommends keeping the bin at 15–25°C (59–77°F). Overfeeding is the classic beginner error — worms eat roughly a quarter of their body weight a day, so check the previous scraps are gone before adding more, and cover each addition with 5cm of bedding. If the bin smells, it’s almost always too much food or moisture — stop feeding for a week and add dry shredded newspaper.
Using Your Finished Compost
You made black gold; now spend it. Finished compost is remarkably forgiving stuff, and a little goes a long way.
In the garden
The EPA’s guidance on using finished compost is practical: as a soil amendment, mix 5–10cm (2–4 inches) of compost into the top 15–23cm (6–9 inches) of soil in beds and borders. As a mulch, spread a 7–8cm (3-inch) layer on the surface, kept a few inches back from stems and tree trunks. It improves structure in clay, adds body to sand, helps soil hold moisture, and slowly feeds plants without the feast-or-famine of synthetic fertiliser.
In pots, lawns and beyond
Mix it into potting soil for container plants — roughly one part compost to three or four parts potting mix works well. Top-dress lawns with a thin sifting in spring, and stir it into the soil around hungry feeders like tomatoes and roses.
What not to do with it
Don’t use unfinished compost directly around plants — it can temporarily rob nitrogen from the soil as it finishes decomposing, and may still contain weed seeds. If it still has recognisable bits or smells sour, give it more time to cure.
What Recent Research Shows
The science of compost keeps moving, and recent work backs up what gardeners have long suspected — with a few nuances worth knowing.
First, the EPA’s 2023 From Field to Bin report, reviewing roughly 250 life-cycle studies, introduced the Wasted Food Scale to replace the 1990s Food Recovery Hierarchy. Its headline: preventing food waste beats every other option, because nothing offsets the resources used to produce food in the first place. But where waste is unavoidable, recycling it into soil amendments genuinely improves long-term soil structure and returns nitrogen and carbon to the ground.
Second, a 2025 study in Agronomy summarised by ICARDA tested compost as a full alternative to chemical fertilisers for sweet basil in poor sandy soil. The heaviest compost treatment pushed soil organic matter to 13.71% and significantly improved plant growth, nutrient content and essential oil production — suggesting good compost can genuinely cut fertiliser dependence, not just supplement it.
Third, an October 2025 study in Water found that compost amendments significantly improved chilli pepper growth — plant height up 58–213% and root length up 35–166% versus unamended controls — with biologically active compost performing best. It also cites prior research showing compost can raise soil organic matter by over 25% and boost water-holding capacity by 58–86%. For home gardeners: the benefits are measurable, and compost quality matters.
The honest caveat: these are controlled studies, and your backyard pile is not a laboratory — results vary with materials, climate and care. But the direction of travel is consistent: compost helps, measurably.
Common Composting Mistakes to Avoid
1. Adding far more greens than browns. Kitchen scraps arrive daily; dry leaves don’t, so piles drift nitrogen-heavy, go slimy and smell of ammonia. The fix: keep a bag of shredded cardboard or dry leaves permanently next to your compost area, and cover every scrap addition with a generous layer.
2. Letting the pile dry out completely. Microbes need moisture to work; a bone-dry pile just sits there for months. The fix is the squeeze test — damp like a wrung-out sponge — checked weekly in warm weather, with a hose nearby.
3. Tossing in meat, dairy and oils “just this once”. One greasy takeaway container can stink out a pile and invite rats for weeks. These materials need sustained high temperatures only commercial facilities reach, so they never belong in a home pile.
4. Composting pet waste. Dog and cat faeces can harbour pathogens and parasites that a home pile won’t reliably destroy, and cat litter (especially clay-based) adds nothing useful. Keep them out entirely; for greener pet routines, see our eco-friendly pet care guide instead.
5. Never turning the pile. A pile that is never turned goes anaerobic in the middle, smells, and decomposes at a crawl. You don’t need to turn weekly forever, but a fork-through every couple of weeks in the first few months makes a dramatic difference.
6. Making the pile too small. A heap the size of a bucket can’t hold enough heat for fast decomposition. Aim for roughly a cubic metre — about 1m on each side. Smaller works, but expect slow, cool composting.
7. Harvesting too early. Impatience is the quietest mistake. Unfinished compost still robs nitrogen from soil and may carry weed seeds. Wait until it’s dark, crumbly, earthy-smelling and cool after turning — then let it cure for four weeks before using it.
Final Recommendations
- Start with a bin or tumbler if you’re unsure. Contained systems are tidier, easier to turn, and more forgiving for a first attempt than an open pile.
- Set up your browns supply before your first scrap. A bag of leaves or shredded cardboard beside the pile prevents 90% of beginner problems.
- Collect scraps in a lidded kitchen caddy and empty it every two to three days, burying each addition under browns.
- Learn the squeeze test — wrung-out sponge — and check moisture weekly for the first month until it becomes second nature.
- Turn the pile every one to two weeks while it’s active; this single habit is the biggest difference between slow and fast composting.
- Keep the never list on the fridge for the first few months: no meat, dairy, oils, pet waste, or diseased plants — until the rules are muscle memory.
- Try a worm bin if you have no garden. It’s the best composting option for flats and balconies, and red wigglers are inexpensive to start.
- Cure your first batch before using it. Four weeks of patience after the pile stops heating gives you genuinely finished, safe compost.
Frequently Asked Questions
A well-maintained backyard pile typically produces finished compost in three to five months, according to the EPA. How much you turn it matters: piles left completely alone can take a year. Worm bins are harvested after three to six months. You’ll know it’s ready when the pile no longer heats up after turning, and the material looks dark and crumbly with an earthy smell and no recognisable scraps.
Yes — worm composting (vermicomposting) is designed for exactly this. A lidded plastic bin with air holes, moist shredded newspaper as bedding, and red wriggler worms fits under a sink or on a balcony. Kept at 15–25°C and fed sensibly, it doesn’t smell. Alternatively, many councils and community gardens run food-scrap drop-off programmes, so check what’s available locally before assuming you need your own setup.
Bad smells mean the pile has gone anaerobic — too wet, too nitrogen-rich, or packed too tight. The fix is the same trio every time: add dry, carbon-rich browns such as shredded cardboard or dry leaves, and turn the pile thoroughly to reintroduce air. Also check you’re burying fresh food scraps under 10–20 cm of browns. If the pile drains poorly in its spot, moving it to higher ground helps.
Not in a home compost pile. The EPA and university extension services agree these attract pests and create odours, and backyard piles don’t reliably reach the temperatures needed to break them down safely. Small amounts of plain cooked vegetables are tolerated by some composters, but meat, dairy, fats and oils are firmly out. Commercial composting facilities handle these fine — home piles don’t.
Aim for two to three times the volume of browns (dry leaves, shredded cardboard, wood chips) as greens (fruit and vegetable scraps, coffee grounds, grass clippings). This practical rule comes from the EPA. Underneath it sits the science: microbes work best at roughly a 30:1 carbon-to-nitrogen ratio, per the University of Maryland Extension. If the pile smells of ammonia, add browns; if nothing is happening, add greens.
Not constantly, but yes, regularly — especially early on. Turning reintroduces oxygen, mixes the cool outer material into the hot centre, and speeds decomposition noticeably. Every one to two weeks during the active phase is the standard advice from the EPA. If you genuinely hate turning, a tumbler does it for you with a few rotations, or accept a slower cool pile that takes the better part of a year.
Often better, actually — it’s fresh, free, and you know exactly what’s in it. Research consistently shows compost improves soil structure, water retention and microbial life, and a 2025 study found compost could fully replace chemical fertiliser for growing sweet basil while boosting soil organic matter to 13.71%. Shop-bought compost is convenient, but homemade costs nothing and diverts your own waste from landfill in the process.
It can if you’re careless, but a well-run pile shouldn’t. The EPA’s rodent-prevention advice is straightforward: use a bin with a lid and floor, keep gaps under about 6mm, maintain the right browns-to-greens ratio, bury food scraps deep under dry material, and never add meat, dairy or greasy foods. If fruit flies appear, exposed scraps on the surface are almost always the cause.
This content is for educational purposes only and does not replace professional horticultural advice. Always consult a qualified gardening professional before making significant changes to your garden or soil management.
Conclusion
Composting at home is one of those rare life upgrades that asks almost nothing and gives back constantly. A bin or a corner of the garden, a kitchen caddy, a sack of dry leaves — that is genuinely the whole shopping list. The scraps you’d have thrown away become the dark, crumbly stuff that makes your garden thrive and your bin bags noticeably lighter.
The part people get wrong is treating it as a science project. It’s not. Keep the browns flowing, keep the pile about as damp as a wrung-out sponge, turn it when you remember, and bury your scraps. Your first batch might take a few months; your second will feel effortless.
And there’s a quiet satisfaction to it that no fertiliser bag delivers: banana peels and autumn leaves turning, over a season, into something that smells of forest floor and feeds your roses. Start this weekend. By next spring, you’ll be spreading your own compost and wondering why you waited.
If you’re building a greener household beyond the compost bin, our Eco Living basics guide walks through the other everyday changes that compound — from cutting food waste at the source to rethinking what goes down the drain.
References
- US Environmental Protection Agency — Composting at Home — https://www.epa.gov/recycle/composting-home
- University of Maryland Extension — Composting (FS-2023-0687) — https://extension.umd.edu/resource/composting-fs-2023-0687
- US Environmental Protection Agency — From Field to Bin: The Environmental Impacts of U.S. Food Waste Management Pathways (2023) — http://www.epa.gov/land-research/field-bin-environmental-impacts-us-food-waste-management-pathways
- ICARDA — Application of Compost as an Organic Amendment for Enhancing Soil Quality and Sweet Basil Growth (Agronomy, April 2025) — https://icarda.org/publications/50114/application-compost-organic-amendment-enhancing-soil-quality-and-sweet-basil
- Suvendran, S. et al. — Evaluating the Effects of Irrigation Water Quality and Compost Amendment on Soil Health and Crop Productivity (Water, October 2025) — https://www.mdpi.com/2073-4441/17/20/2927